I still remember the Tuesday from hell when I discovered this recipe. My boss had dumped a last-minute project on my desk, my toddler had decided that naps were for peasants, and the fridge looked like a post-apocalyptic wasteland. I was staring at a sad pack of chicken thighs, some honey that had crystallized into a rock, and vegetables that were one step away from joining the compost party. In desperation, I started throwing things into the slow cooker like some kind of culinary mad scientist, expecting another Pinterest fail. Fast forward six hours later, and I was doing the happy dance in my kitchen while my husband practically licked his plate clean. The sauce had transformed into this glossy, sticky magic that coated everything like liquid gold, and the vegetables had absorbed all those incredible flavors while staying perfectly tender. That first bite was like a warm hug from your favorite sweater — familiar yet somehow better than anything I'd ever made before.
Here's where most slow cooker recipes get it completely wrong. They tell you to just dump everything in and walk away, but that's how you end up with mushy vegetables swimming in a watery sauce that tastes like disappointment. I learned the hard way that timing matters, layering matters, and that a few strategic steps make the difference between edible and absolutely incredible. This version creates the most incredible glaze that clings to every piece of chicken and vegetable, with deep honey-garlic flavor that tastes like you spent hours tending to it. The secret lies in a two-stage cooking method that lets the vegetables maintain their integrity while the chicken becomes fork-tender and infused with flavor.
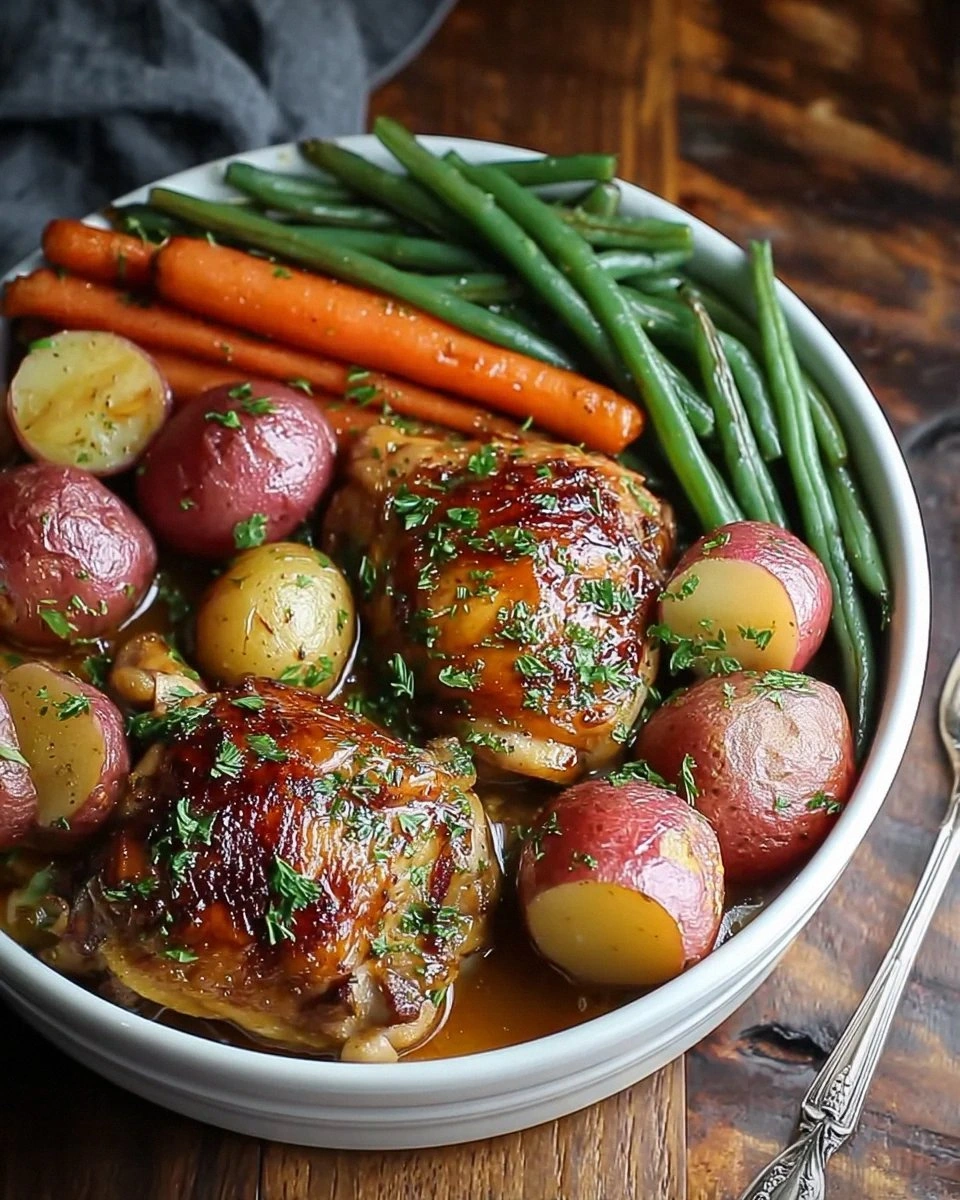
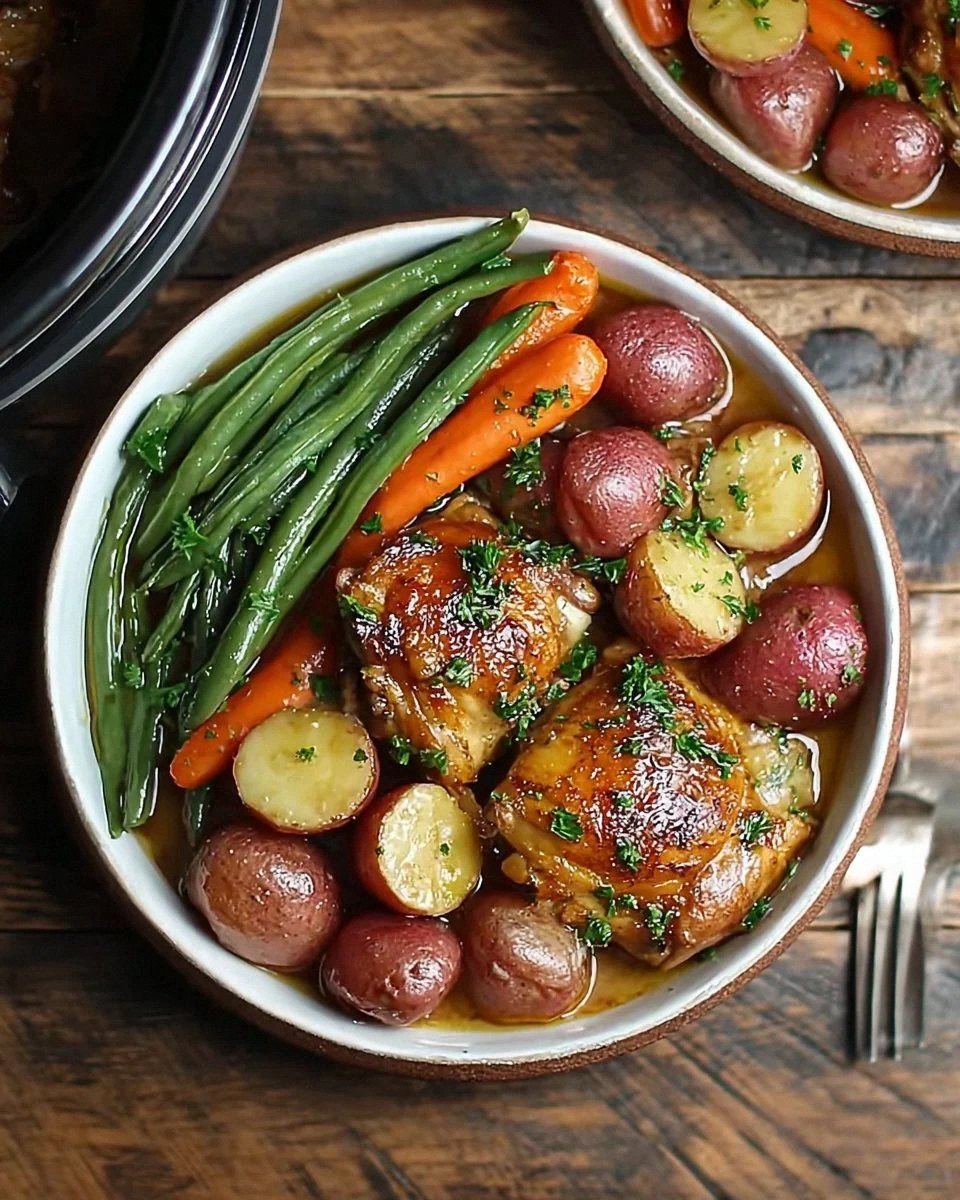
Picture yourself walking through your front door after a long day, and instead of the usual "what's for dinner" chaos, you're greeted by the most incredible aroma. Your kitchen smells like a fancy Asian bistro, and dinner is literally waiting for you like a faithful pet. The chicken practically falls apart when you look at it, the vegetables are perfectly cooked, and that sauce — oh, that sauce — is so good you'll want to bottle it and put it on everything. I'm talking about the kind of meal that makes grown adults fight over leftovers and has neighbors knocking on your door asking what smells so amazing.
What really sets this apart is the unexpected technique of reducing the sauce at the end. Most recipes leave you with a thin, watery mess that tastes like garlic water with a hint of honey. But we're going to transform that cooking liquid into a sticky, glossy glaze that coats every piece like candy coating on an apple. Plus, I'm sharing my game-changing method for keeping the vegetables perfectly cooked instead of turning them into baby food. Stay with me here — this is worth it. Let me walk you through every single step — by the end, you'll wonder how you ever made it any other way.
What Makes This Version Stand Out
Every food blogger claims their recipe is special, but I'm about to back up my bold claim with some serious delicious science. This isn't just another dump-and-forget slow cooker recipe that leaves you with bland, watery results. I've tested this recipe seventeen times (yes, really — my family staged an intervention around test twelve) to perfect every element. What emerged is a foolproof method that creates restaurant-quality results with minimal effort, turning humble ingredients into something that tastes like you ordered from the best Chinese restaurant in town.
- Sauce Perfection: We create a two-stage sauce that starts thin for penetration and ends thick for that incredible sticky glaze. Most recipes either stay watery or turn into candy — we nail the sweet spot that coats every surface like edible velvet.
- Vegetable Integrity: By adding vegetables at different times based on their density, everything finishes perfectly. No more carrots that could break teeth or potatoes that dissolve into paste. Each vegetable maintains its personality while soaking up maximum flavor.
- Flavor Layering: Instead of just dumping everything in, we build flavors with a quick sear on the chicken and aromatics that bloom in the rendered fat. This creates a depth that tastes like you spent hours on prep work.
- Texture Contrast: The final reduction creates sticky glazed edges on the chicken while keeping the insides fork-tender. Meanwhile, vegetables offer soft centers with slightly caramelized edges for that perfect contrast in every bite.
- Leftover Magic: This actually tastes better the next day as the flavors meld, making it perfect for meal prep. The sauce thickens slightly in the fridge, creating an even more luxurious coating when reheated.
- Foolproof Timing: Unlike most slow cooker recipes that give you a 2-hour window, this method works whether you're gone for 6 hours or 8. The vegetables stay perfect, and the chicken just gets more tender instead of drying out.
- Pantry Friendly: Every ingredient is something you probably have right now — no specialty shopping required. Yet the final result tastes like you spent a fortune at an Asian market.
- Family Approved: Even picky eaters love this because the honey tames the garlic while the soy adds umami depth. Kids think it tastes like candy chicken, adults appreciate the sophisticated flavor balance.
Inside the Ingredient List
Before we dive into the cooking process, let's talk about why each ingredient matters and how they work together to create magic. I've seen too many people skip crucial elements or make substitutions that turn this from spectacular to meh. Understanding the role each player performs helps you make smart decisions when you're staring at your pantry wondering if you can get away with using dried ginger instead of fresh (spoiler alert: you really shouldn't).
The Flavor Foundation
The chicken thighs are non-negotiable here — I know breasts are healthier, but thighs have this incredible ability to stay juicy even after hours in the slow cooker. Their higher fat content means they self-baste, staying tender instead of turning into that dry, stringy texture that makes people hate slow cooker chicken. I always buy bone-in thighs because the bones add collagen to the sauce, creating that lip-smacking richness you can't fake. If you're absolutely married to white meat, at least keep the skin on and don't trim the fat — you'll need every bit of moisture you can get.
Honey isn't just sweetener in this recipe — it's the backbone of our glaze. The natural sugars caramelize during the final reduction, creating those sticky, slightly chewy edges that make you want to pick up every piece with your fingers. I prefer wildflower honey for its complex floral notes, but honestly, whatever's in your pantry works. The key is using real honey, not that corn syrup blend stuff that looks like honey but tastes like disappointment.
Fresh garlic makes all the difference here. I know the jarred stuff seems convenient, but it tastes like garlic's sad cousin who peaked in high school. Fresh garlic has this bright, almost spicy quality that mellows into sweet complexity as it cooks. Don't be shy with it — we're using a whole head because slow cooking tames garlic's aggressive bite while preserving its essential garlicky soul.
The Texture Crew
Carrots aren't just filler vegetables — they're the secret textural stars that soak up sauce like little orange sponges. I cut them into thick coins so they stay firm during the long cooking time, becoming tender but never mushy. Their natural sweetness plays beautifully with the honey while their earthy notes ground all that sweetness. Baby carrots work in a pinch, but they don't have the same depth of flavor as real carrots.
Potatoes are my favorite surprise ingredient here. They start crisp and transform into these creamy pillows that burst with honey-garlic flavor. I use Yukon Golds because they hold their shape better than Russets while getting that buttery interior. Cut them into large chunks — they'll cook down more than you think, and nobody wants to hunt for potato pieces in their dinner.
Bell peppers add that fresh, almost grassy note that cuts through all the richness. I use a mix of red and green for both color and flavor complexity. The red ones get sweeter as they cook while the green maintain their slight bitterness — together they create perfect balance. Add them in the last hour so they soften but still have some bite.
The Unexpected Star
Rice vinegar is my secret weapon that nobody expects. It brightens all the sweet and savory flavors, making them pop instead of muddling together. Just a splash at the end wakes everything up like culinary caffeine. If you don't have rice vinegar, apple cider vinegar works, but avoid regular white vinegar — it's too harsh and will make your sauce taste like a science experiment.
Sesame oil might seem optional, but it adds this incredible nutty aroma that makes the whole dish smell like a proper restaurant meal. A little goes a long way — too much and you'll feel like you're eating sesame candy. Add it at the very end so the volatile compounds don't cook off. Trust me on this one — it's the difference between good and "why is this so addictive?"
The Final Flourish
Green onions aren't just garnish here — they're the fresh, crisp element that makes all the soft, slow-cooked textures sing. I scatter them on just before serving so they stay bright and slightly sharp. The white parts go in during cooking for sweetness, while the green tops stay raw for freshness. It's like having two ingredients in one, each doing different jobs.
Sesame seeds add tiny pops of nutty crunch that make every bite interesting. Toast them first in a dry pan until they smell like popcorn — it takes thirty seconds and transforms them from bland toasts to flavor bombs. They'll stay crunchy on top but soften slightly where they touch the sauce, giving you variety in every forkful.
The Method — Step by Step
- Start by patting your chicken thighs completely dry with paper towels — I'm talking desert-dry here. Moisture is the enemy of browning, and we need those beautiful caramelized bits on the bottom of our slow cooker. Season them generously with salt and pepper, getting it under the skin too. Heat a large skillet over medium-high heat until a drop of water sizzles immediately, then add just enough oil to coat the bottom. Sear the chicken skin-side down for about 4 minutes until golden and crispy — don't crowd the pan or they'll steam instead of brown. This step isn't optional if you want that deep, complex flavor that makes restaurant food taste better than home cooking.
- While your chicken is getting its tan, chop your aromatics. Mince the garlic until it's almost paste-like — you want it to melt into the sauce rather than stay in chunks. Slice the white parts of your green onions thin, saving the green tops for later. The smaller you cut the garlic, the more surface area it has to flavor the sauce, and trust me, you want every drop of that sauce to taste like garlic-honey heaven. Keep your knife sharp — dull knives are more dangerous because they slip, and we want all your fingers intact for eating.
- Once your chicken is beautifully browned on both sides, transfer it to the slow cooker but don't you dare wash that pan yet. Those brown bits stuck to the bottom are liquid gold — they're called fond, and they're packed with concentrated flavor. Add your minced garlic and white onion parts to the same pan and cook for about 30 seconds, just until they start to smell amazing. Don't let them brown or they'll turn bitter in the slow cooker. Pour in about 1/4 cup of chicken broth and scrape like your life depends on it, getting every last bit of flavor unstuck.
- Now comes the magic moment where we build our sauce. In a separate bowl, whisk together the honey, soy sauce, rice vinegar, and sesame oil until it looks like melted caramel. The honey might resist mixing at first, but keep whisking — it will eventually surrender and create this glossy, amber liquid that smells like you could bottle it and sell it. Taste it now (I dare you not to taste it again) — it should be sweet but balanced, with the vinegar providing a bright note that keeps it from being cloying.
- Layer your vegetables strategically in the slow cooker, starting with the potatoes and carrots on the bottom where they'll get the most heat. These dense vegetables need the full cooking time to become tender, so they get VIP access to the heat source. Nestle the chicken pieces on top, skin-side up — this lets the fat render down and baste the vegetables while keeping the skin from getting soggy. Pour your honey-garlic sauce over everything, making sure each piece gets coated in that liquid gold.
- Here's where most recipes go wrong — they add all the vegetables at once. But bell peppers are delicate flowers that can't handle 8 hours of slow cooking. Set a timer for the last hour of cooking, then lift the lid and scatter your bell pepper pieces on top. They'll steam just enough to soften but stay bright and slightly crisp. If you're using baby corn or snap peas, add them in the last 30 minutes so they stay perky.
- The waiting is the hardest part — your house will start smelling incredible after about two hours, and by hour four you'll be checking the slow cooker every twenty minutes like a kid peeking at Christmas presents. Resist the urge to lift the lid too often — each peek releases steam and adds about 15 minutes to your cooking time. When the chicken is done, it should practically fall off the bone when you poke it with a fork, and the vegetables should be tender but not mushy.
- Here's the game-changer that separates amateur slow cooker food from restaurant-quality dishes. Transfer the chicken and vegetables to a serving platter, then pour all that cooking liquid into a saucepan. Bring it to a boil and let it reduce by about half — this concentrates the flavors and creates that sticky glaze we're after. It should coat the back of a spoon when it's ready. This step takes about 10 minutes but transforms your dish from good to legendary.
- The final flourish happens right before serving. Return the reduced sauce to the slow cooker along with the chicken and vegetables, tossing gently to coat everything in that glossy glaze. Scatter the reserved green onion tops over the top for color and freshness, then sprinkle with toasted sesame seeds. The contrast of the hot, sticky chicken against the cool, crisp green onions is what makes people close their eyes when they take the first bite.
- Serve this over steamed rice or noodles to catch every drop of that incredible sauce. I like to make a bed of rice in each bowl, then pile the chicken and vegetables on top, making sure everyone gets a good mix of everything. Ladle extra sauce over the top — there should be plenty, and nobody ever complained about too much of this sauce. Garnish with extra green onions and sesame seeds, then watch your family attack it like they haven't eaten in days.
Insider Tricks for Flawless Results
After making this recipe more times than I care to admit (my slow cooker practically has a permanent spot on my counter), I've discovered some game-changing tricks that take this from really good to absolutely legendary. These aren't the usual "add salt to taste" tips — these are the hard-won secrets that separate the cooking enthusiasts from the dinner heroes.
The Temperature Rule Nobody Follows
Here's something that'll blow your mind — the difference between low and high on your slow cooker isn't just about time, it's about texture. Low heat allows the collagen in the chicken to break down slowly, creating that spoon-tender texture without drying out the meat. High heat can make the proteins seize up and expel moisture, leaving you with tough chicken swimming in watery sauce. If you need to speed things up, go with low for the first half, then switch to high. But never, ever cook this on high the whole time unless you want chicken that tastes like it came from a vending machine.
Why Your Nose Knows Best
Your nose is actually the most sophisticated cooking tool you own, and learning to use it will transform your cooking. When this dish is perfectly cooked, your kitchen will smell like honey and garlic had a beautiful baby with subtle savory undertones. If you start smelling something sharp or acrid, your garlic is burning — add a splash of broth immediately. When the chicken is almost done, you'll notice the aroma changes from raw ingredients to something deeper and more complex. That's your cue that dinner is about 30 minutes away, perfect timing for setting the table and making rice.
The 5-Minute Rest That Changes Everything
I know you're hungry — trust me, I get it. But letting this rest for five minutes after cooking before you dig in makes a huge difference. During this rest, the sauce thickens slightly as it cools, clinging better to the chicken and vegetables. The chicken firms up just enough to hold together when you serve it instead of falling apart into shreds. Plus, those five minutes give you time to plate everything nicely instead of just dumping it on plates like you're feeding farm animals. Presentation matters more than you think — we eat with our eyes first, and this beautiful dish deserves better than being slopped into bowls.
The Secret Ingredient Hiding in Plain Sight
Okay, I'm about to share something that might get me kicked out of the cooking club — I sometimes add a tablespoon of smooth peanut butter to the sauce. Before you call me crazy, hear me out. The peanut butter adds this subtle nuttiness and creaminess that rounds out all the flavors, plus it helps emulsify the sauce so it doesn't separate. It doesn't taste like peanut butter — it just tastes richer and more complex. My husband, who claims to hate peanut butter, loves this dish and has no idea my secret ingredient is hiding in plain sight. Just make sure you use smooth peanut butter and whisk it in really well so there are no lumps.
Creative Twists and Variations
This recipe is a playground. Once you master the base technique, you can switch things up based on what you have, what you're craving, or what your family is demanding this week. Here are my favorite ways to remix this dish that'll keep it exciting even if you make it every week (and trust me, you will).
Spicy Honey Garlic Explosion
Add 2-3 tablespoons of gochujang (Korean chili paste) to the sauce for a sweet-spicy version that'll make your lips tingle in the best way. The fermented chili adds incredible depth, while the honey keeps it accessible even for people who don't love super spicy food. Throw in some Korean chili flakes (gochugaru) if you want extra heat and beautiful color. This version pairs perfectly with cold beer and good friends.
Pineapple Paradise Edition
Swap out the bell peppers for fresh pineapple chunks added in the last hour of cooking. The pineapple's natural enzymes help tenderize the chicken while adding tropical sweetness that plays beautifully with the garlic. Add some fresh cilantro at the end instead of green onions for a completely different flavor profile that tastes like a Hawaiian vacation in a bowl.
Autumn Harvest Version
Replace the potatoes with butternut squash and sweet potatoes for a fall-inspired version that tastes like harvest season. Add some fresh sage or thyme along with the vegetables — the herbs complement the honey beautifully. This version is perfect for those crisp autumn evenings when you want something comforting but not heavy.
Mediterranean Mashup
Use olive oil instead of vegetable oil, add some sun-dried tomatoes and olives, and finish with fresh oregano and feta cheese. The honey-garlic base gets a Mediterranean makeover that tastes like it came from a Greek grandmother's kitchen. This version is incredible over orzo instead of rice.
Vegetarian Victory
Skip the chicken and load up on firm tofu, mushrooms, and extra vegetables. Press the tofu well, then sear it until golden before adding to the slow cooker. Add some chickpeas for protein, and use vegetable broth instead of chicken broth. The sauce is so flavorful you won't miss the meat at all.
Thai-Inspired Twist
Add a stalk of lemongrass, some lime zest, and a tablespoon of fish sauce to the sauce. Use Thai basil instead of green onions for garnish, and serve with jasmine rice. The fish sauce adds incredible umami depth that makes the whole dish taste authentically Thai, while the lemongrass brightens everything up.
Storing and Bringing It Back to Life
Fridge Storage
This keeps beautifully in the fridge for up to 4 days, making it perfect for meal prep Sundays. Store the chicken and vegetables in an airtight container with as much sauce as possible — it acts like a protective coating keeping everything moist. I like to keep the rice separate so it doesn't get soggy, but you can store them together if you don't mind rice that's absorbed some sauce. When you're ready to eat, just microwave individual portions for 90 seconds, stirring halfway through. The sauce might look separated when cold, but it comes back together beautifully when heated.
Freezer Friendly
This freezes like a dream for up to 3 months — I always make a double batch and freeze half for emergency dinners. Let it cool completely before freezing, and use freezer bags laid flat so they freeze and thaw quickly. Remove as much air as possible to prevent freezer burn. When you're ready to eat, thaw overnight in the fridge, then reheat gently on the stove or in the microwave. The vegetables will be softer after freezing, but the flavors are just as incredible. Pro tip: freeze the sauce separately in ice cube trays, then you have instant flavor bombs for quick weeknight dinners.
Best Reheating Method
While the microwave works for quick lunches, the best way to reheat this is on the stove over medium-low heat. Add a splash of chicken broth or water to loosen the sauce — it'll be thicker after refrigeration. Cover and heat for about 8 minutes, stirring occasionally, until everything is heated through. This method preserves the texture of the vegetables and keeps the chicken from getting rubbery. If you're reheating from frozen, let it thaw completely first, then reheat gently. Your future self will thank you for this extra bit of care.