Picture this: it's Saturday night, the rain is tapping against your kitchen window like nature's own percussion section, and you're staring at a pint of blackberries that are just this close to turning into a science experiment. The chocolate bars on your counter are giving you side-eye, practically begging to be transformed into something spectacular. Been there? Good. Because that's exactly how this Dark Chocolate Blackberry Cake was born — out of pure desperation and a refusal to let good ingredients die a boring death.
The first time I made this cake, I was attempting to impress a date who claimed they "didn't really like dessert." Challenge accepted. By the time the aroma of dark chocolate and simmering berries filled my apartment, said date was hovering near the oven like a cartoon character floating toward a pie on a windowsill. The moment they took a bite, eyes went wide, and suddenly they were requesting a second slice "just to be sure." Spoiler alert: we've been married for three years now. Coincidence? I think not.
What makes this cake different from every other chocolate berry situation you've encountered? It's not just throwing some berries into a chocolate cake and calling it a day. Oh no, my friend. We're talking about a cake where the blackberries don't just sit there looking pretty — they perform. They create these pockets of jammy intensity that burst against the backdrop of the richest, most velvety chocolate cake you've ever met. The kind of cake that makes you close your eyes involuntarily when you taste it, like you're in some sort of chocolate meditation.
Most recipes get this completely wrong. They either make a chocolate cake with a few sad berries on top, or they create a berry cake with a hint of cocoa. But here's what actually works: we infuse blackberry puree into the frosting, fold fresh berries into the batter, and create a glossy ganache that ties everything together like the perfect ending to your favorite novel. Stay with me here — this is worth it.
What Makes This Version Stand Out
Depth Charge: The espresso powder doesn't make this taste like coffee — it's like turning up the volume on your chocolate's flavor amplifier. You'll get these incredible mocha undertones that make people ask "what's that amazing flavor I can't quite place?" It's your secret weapon, and trust me, even friends who claim they hate coffee will beg for your secret.
Berry Distribution System: Instead of just dumping berries into the batter and hoping for the best, we create a strategic berry situation. Some get folded in whole, some get slightly crushed, and some stay fresh for the top. This means every single bite has the perfect berry-to-chocolate ratio. No more hunting for the one bite with fruit in it.
Moisture Lock: The combination of oil and the right amount of boiling water creates this incredibly tender crumb that stays moist for days. I'm talking about a cake that actually gets better overnight, if you can resist eating it all in one sitting. I dare you to taste this and not go back for seconds.
Frosting Revolution: Most berry frostings are either grainy from too much fruit or artificial-tasting from extracts. We make a concentrated blackberry puree that gets beaten into a classic buttercream, creating this naturally purple, intensely flavored cloud of perfection. It's like the berries and butter had a beautiful baby.
Texture Play: We're not just going for soft and sweet here. The cake itself is moist and tender, the berries provide little bursts of brightness, and the ganache sets into this shiny, slightly firm top that cracks beautifully when you slice it. Picture yourself pulling this out of the oven, the whole kitchen smelling incredible.
Crowd Psychology: This cake has a 100% success rate at gatherings. I've seen self-proclaimed "not really a dessert person" people go back for thirds. I've watched kids who normally turn up their noses at fruit-laden desserts devour this. If you've ever struggled with baking something that pleases everyone, you're not alone — and I've got the fix.
Make-Ahead Magic: The components actually benefit from being made ahead. The ganache can be prepped two days early, the blackberry puree keeps for a week, and the cake layers freeze beautifully. This means you can spread the work out and still serve something that tastes like you spent all day on it.
Alright, let's break down exactly what goes into this masterpiece...
Inside the Ingredient List
The Flavor Foundation
All-purpose flour is your canvas here, but don't just grab any old bag from the back of your pantry. Fresh flour makes a difference you can actually taste — it should smell slightly sweet and nutty, not musty or stale. This sets the foundation for a tender crumb that will support all our other bold flavors without turning gummy or tough. If you only have cake flour, you can use it but reduce the amount by two tablespoons per cup since it's got more starch.
Then we have cocoa powder, and this is where you need to be picky. Go for a good quality unsweetened cocoa — Dutch-processed if you want a smoother, more mellow chocolate flavor, natural if you're after that intense, slightly bitter chocolate punch. I keep both in my pantry and switch depending on my mood and who I'm baking for. The cocoa doesn't just add flavor; it affects the color, the texture, and even how much liquid the batter can handle.
The Texture Crew
Sugar does way more than just sweeten — it's creating the tender, moist texture that makes this cake disappear faster than your willpower at midnight. The crystals cut into the butter during creaming, creating tiny air pockets that expand in the oven for lift. But here's the thing: too much sugar and your cake collapses, too little and it's tough and dry. This recipe hits the sweet spot (pun absolutely intended).
Oil versus butter is a choice that changes everything. Butter gives you flavor, but oil gives you that stay-moist-for-days texture we're after. Using melted coconut oil adds this subtle tropical note that plays beautifully with the berries, but vegetable oil keeps things neutral if you want pure chocolate and fruit to shine. I've made it both ways, and honestly, the coconut oil version makes people ask questions in the best way.
The Unexpected Star
Espresso powder is the ingredient that makes people say "I don't know what you did, but this tastes expensive." It's not enough to make the cake taste like coffee — instead, it amplifies the chocolate flavor like turning up the contrast on a photo. If you don't have espresso powder, you can use instant coffee, but reduce the amount by half since it's more bitter. And here's a confession: I'll be honest — I ate half the batch before anyone else got to try it, and I blame the espresso powder for making it too good to resist.
The boiling water might seem weird, but it's actually doing something magical. It blooms the cocoa powder, releasing flavor compounds that would otherwise stay locked away. Think of it like steeping tea — the hot water extracts all the good stuff. Just make sure your eggs and other ingredients are at room temperature so they don't scramble when you add the hot water.
The Final Flourish
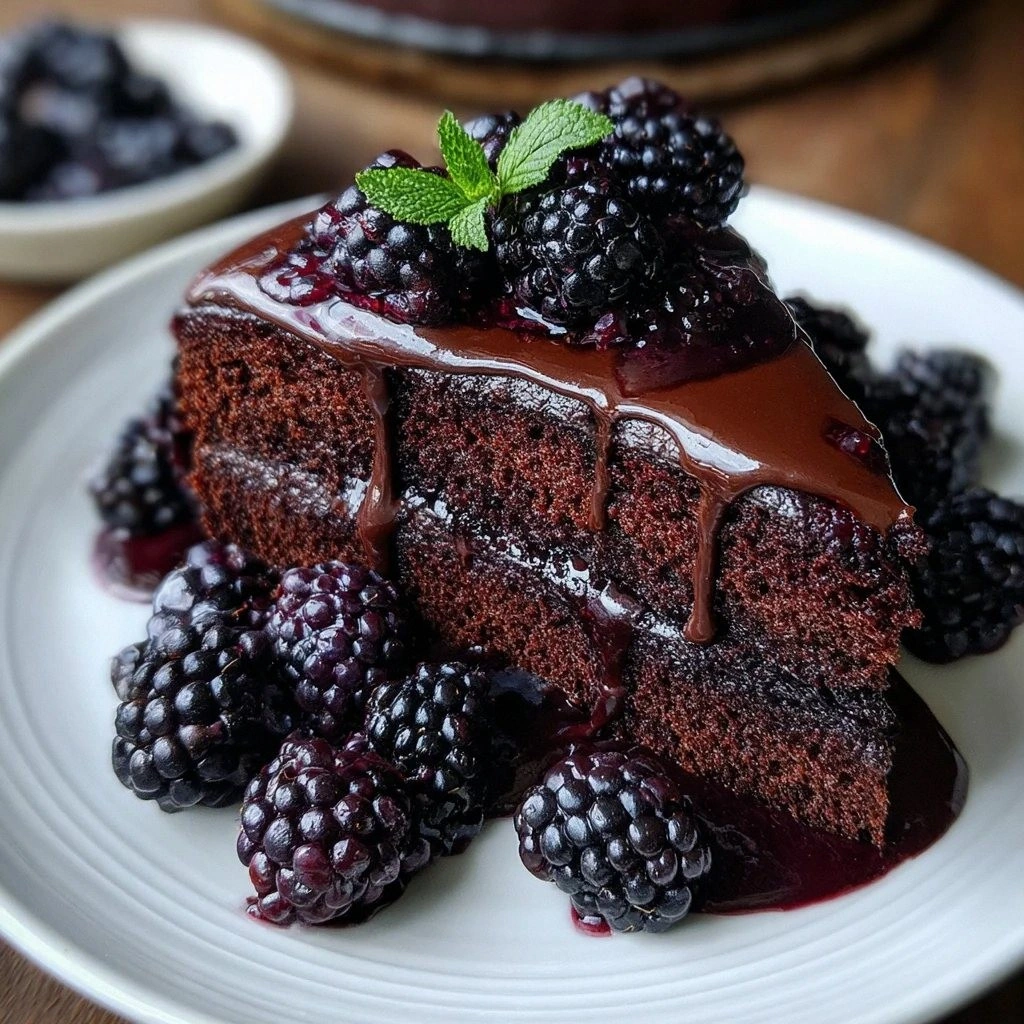
Fresh blackberries are the divas of this show, and they need to be treated right. Look for berries that are plump, deeply colored, and still have that silvery bloom on them — that's natural protection that keeps them fresh. If they smell like nothing, they'll taste like nothing. And here's the game-changer: we're using them three ways. Some get folded into the batter, some become a concentrated puree for the frosting, and some stay fresh for garnish. Okay, ready for the game-changer?
Buttermilk is my secret weapon for the most tender cake. The acidity tenderizes the gluten in the flour, giving you a cake that practically melts on your tongue. No buttermilk? No problem. Add a tablespoon of lemon juice or white vinegar to regular milk and let it sit for five minutes. It won't be quite as complex, but it'll do the job. The batter might look slightly curdled when you add the buttermilk — that's exactly what you want.
Everything's prepped? Good. Let's get into the real action...
The Method — Step by Step
- Preheat your oven to 350°F (175°C). This isn't just about getting hot — it's about creating the perfect environment for your cake to rise evenly. Position your rack in the center because too high and the top burns before the middle is done, too low and you get a dense bottom. Grease two 9-inch round pans with butter, then dust with cocoa powder instead of flour. This gives you a chocolate crust on the edges and prevents any white specks on your beautiful cake. The smell when this starts baking? Absolute perfection.
- Whisk together your flour, cocoa powder, baking powder, baking soda, salt, and espresso powder in a large bowl. This isn't just mixing — it's ensuring every bite has the same perfect balance of flavors. The espresso powder should be distributed so evenly that you can't find a single speck. Use a whisk, not a spoon, because we're aerating here too. Set this aside and let's talk about the wet ingredients.
- In your stand mixer (or with a hand mixer if you're feeling ambitious), cream together the butter and sugar until it's light and fluffy. You're not just combining — you're incorporating air that will help the cake rise. It should be pale and increased in volume, looking like slightly gritty clouds. This takes about 3-4 minutes on medium speed, but don't rush it. The mixture should leave a trail when you lift the beaters.
- Add the eggs one at a time, beating well after each addition. This is where patience pays off — each egg needs to be fully incorporated before the next one joins the party. The mixture might look slightly curdled when you add the eggs, especially if they're cold from the fridge. That's normal and will smooth out when you add the dry ingredients. Scrape down the sides of the bowl religiously because unmixed butter at the bottom is the enemy of even texture.
- Reduce the mixer speed to low and add the vanilla. Now here's where we get a little unconventional — add one-third of the dry ingredients, then half the buttermilk, then another third of dry, then the remaining buttermilk, then the final third of dry. Starting and ending with dry prevents the batter from breaking. Mix just until combined after each addition. Overmixing develops gluten and gives you tough cake, and nobody wants that.
- Carefully pour in the boiling water and whisk until smooth. The batter will be thin — thinner than you think it should be. Resist the urge to add more flour. This is exactly what we want for a moist, tender cake. The hot water is doing its magic, blooming the cocoa and creating a batter that will bake up incredibly light. Let it sit for about 30 seconds while you prepare the berries.
- Gently fold in most of the blackberries, saving a few for the top. Use a spatula and make figure-eights through the batter, turning the bowl as you go. The frozen berries (if you took my advice) will stay suspended rather than sinking to the bottom. Don't overmix here — we want distinct berry pockets, not purple swirl throughout. The batter should look like a night sky with chocolate galaxies and berry stars.
- Divide the batter between your prepared pans and smooth the tops. Tap each pan firmly on the counter (this releases air bubbles) and slide them into the oven. Bake for 28-32 minutes, but start checking at 25. The edges will start pulling away from the sides, and a toothpick inserted in the center should come out with just a few moist crumbs. Overbaking is the enemy of moist cake, so when in doubt, pull it out. Let them cool in the pans for 10 minutes before turning out onto wire racks.
- While the cakes cool, make your blackberry puree by simmering 1 cup of berries with 2 tablespoons of sugar until they break down into a thick sauce. Strain out the seeds (or leave them if you like texture) and let it cool completely. This concentrate will flavor your frosting, and trust me, it's worth the extra step. The smell while this simmers? Like summer in a saucepan.
- Beat the butter for the frosting until it's pale and fluffy, about 5 minutes. This is the moment of truth — add the powdered sugar gradually to avoid a snowstorm in your kitchen. Once it's incorporated, beat in the cooled blackberry puree. The color will be this gorgeous natural purple that makes food coloring look amateur. Add cream until you reach spreading consistency — you want it thick enough to hold between layers but soft enough to spread without tearing your cake.
- For the ganache, heat the cream until it's just steaming, then pour it over chopped chocolate. Let it sit for 2 minutes (don't rush this), then whisk from the center outward until it's glossy and smooth. Add the corn syrup or honey for shine, and vanilla if using. Let it cool until it's thick but still pourable — about 15 minutes. You want it to flow over the edges just slightly, creating those beautiful drips that make people think you're a professional.
- Assembly time! Place one cake layer on your serving plate and spread with blackberry frosting. Add the second layer and frost the top and sides. Don't worry about making it perfect — rustic is beautiful here. Chill for 15 minutes to set, then pour the ganache over the center and nudge it toward the edges with an offset spatula. Arrange fresh berries on top, and if you're feeling fancy, add some chocolate shavings. This next part? Pure magic.
That's it — you did it. But hold on, I've got a few more tricks that'll take this to another level...
Insider Tricks for Flawless Results
The Temperature Rule Nobody Follows
Room temperature ingredients aren't just a suggestion — they're the difference between a cake that's dense and heavy versus one that's light and tender. Cold eggs don't incorporate properly, cold butter won't trap air, and cold buttermilk can cause the batter to seize. Take everything out of the fridge at least an hour before you start. If you're impatient (I see you), you can warm eggs in a bowl of warm water for 10 minutes, microwave buttermilk in 5-second bursts until it's just warm, and cut butter into small pieces to speed up softening. Your future self will thank you when you're eating cloud-like cake instead of chocolate rubber.
Why Your Nose Knows Best
Don't just rely on the timer — your nose is an incredibly sophisticated detection system. When this cake is nearly done, your kitchen will fill with the most intoxicating aroma of chocolate and berries. It's like the cake is announcing its readiness. When you smell this, start checking for doneness. A friend tried skipping this step once — let's just say it didn't end well. She got distracted by a phone call and ended up with cake that could've been used as a doorstop. Trust your senses; they've been refined over thousands of years for exactly this purpose.
The 5-Minute Rest That Changes Everything
After you add the boiling water, let the batter rest for exactly 5 minutes. This isn't just cooling time — it's when the cocoa fully hydrates and develops its flavor. Stir it once halfway through. You'll notice the color deepens and the chocolate aroma intensifies. It's like the difference between instant coffee and properly brewed espresso. This tiny pause transforms good cake into "oh my god what did you put in this" cake. Don't walk away from the stove here — 5 minutes is the sweet spot. Too short and you don't get full flavor development, too long and the batter starts to thicken too much.
The Toothpick Test Truth
Everyone knows about the toothpick test, but here's what they don't tell you: for this cake, you want moist crumbs, not a clean toothpick. A completely clean toothpick means overbaked cake that'll be dry by tomorrow. The residual heat will finish cooking the center as it cools. Insert the toothpick about 1 inch from the center — if it comes out with a few moist crumbs clinging to it, you're golden. If it comes out with wet batter, give it another 3-4 minutes. This is the difference between a cake that's good today and one that's still incredible three days later.
Make It Your Signature
Once you've made this cake a few times, start making small adjustments to make it uniquely yours. Add a pinch of cardamom to the dry ingredients for a Scandinavian twist, or replace the vanilla with almond extract for a marzipan note. I sometimes add a tablespoon of good balsamic vinegar to the blackberry puree — it intensifies the berry flavor in a way that makes people ask questions. The base recipe is bulletproof, so feel free to experiment. Just keep notes so you can recreate your masterpiece when everyone starts requesting it for every gathering.
Creative Twists and Variations
This recipe is a playground. Here are some of my favorite ways to switch things up:
The Raspberry Revolution
Swap the blackberries for raspberries and add a tablespoon of Chambord to the frosting. The raspberries give you a brighter, more tart flavor that cuts through the richness of the chocolate. The Chambord adds this sophisticated note that makes it taste like something from a Parisian café. Use golden raspberries if you can find them — they create this gorgeous pink frosting without any food coloring. The seeds are more prominent than blackberries, so strain your puree if you want silky smooth frosting.
The Cherry Bomb
Replace blackberries with pitted sour cherries and add a teaspoon of almond extract to the cake. The sour cherries give you these incredible pockets of bright acidity against the chocolate, and the almond creates this cherry-almond joy that tastes like the best Black Forest cake you've ever had. I like to add a splash of kirsch to the ganache for that authentic German flavor. If you can't find fresh sour cherries, frozen work beautifully — just thaw and drain them first.
The Triple Chocolate Threat
Keep the blackberries but add chocolate chips to the batter and use white chocolate in the ganache. The triple chocolate situation gives you incredible depth — dark chocolate cake, milk chocolate chips, and white chocolate topping. The blackberries prevent it from being chocolate overload by providing those fresh, tart notes. It's like a chocolate berry party where everyone's invited and somehow it all works together perfectly.
The Tropical Storm
Replace blackberries with diced mango and add coconut milk to both the cake and frosting. Use coconut oil and add toasted coconut flakes between the layers. The mango gives you these sunny pockets of sweetness that make the chocolate taste even richer by comparison. It's like a chocolate-covered mango truffle in cake form. Add a pinch of chili powder to the ganache for a subtle heat that builds as you eat — it's the kind of cake that makes people do a double-take in the best way.
The Breakfast of Champions
Turn this into a brunch showstopper by adding orange zest to the cake, using cream cheese in the frosting, and topping with fresh berries. The orange brightens everything up and makes it feel perfectly acceptable to eat cake for breakfast. I like to serve this with strong coffee and pretend it's a coffee cake that just happens to be incredibly moist and chocolatey. The cream cheese frosting adds tang that makes it feel less indulgent, even though it's just as delicious.
The Winter Wonderland
Use frozen mixed berries and add warming spices like cinnamon, nutmeg, and a pinch of cloves. The frozen berries work better than fresh in winter anyway, and the spices make your house smell like the holidays. Add a tablespoon of molasses to the batter for depth and serve with a dollop of whipped cream spiked with a little bourbon. It's comfort food at its finest — the kind of cake that makes January bearable.
Storing and Bringing It Back to Life
Fridge Storage
Once completely cooled, cover the cake with a cake dome or an inverted large bowl. Plastic wrap works but can stick to the ganache and create a mess. In the fridge, this cake stays perfect for up to 5 days, though it rarely lasts that long. The flavors actually meld and improve after the first day — it's like the cake and berries get to know each other better. If your fridge is particularly dry, add a small piece of apple or bread to the container — it'll dry out instead of your cake.
Freezer Friendly
This cake freezes beautifully, but do it right: freeze the layers unfrosted for up to 2 months, wrapped tightly in plastic wrap then foil. The frosted cake can be frozen too, but freeze it uncovered first until the ganache is solid, then wrap. This prevents the wrap from sticking and ruining your beautiful finish. Thaw overnight in the fridge, then let it come to room temperature for 2 hours before serving. I've served this to guests after freezing and they couldn't tell the difference — it's that good at bouncing back.
Best Reheating Method
Room temperature is how this cake tastes best, but if it's been in the fridge, let it sit out for 30-60 minutes before serving. If you must warm it (and sometimes you must), a 10-second zap in the microwave does wonders — just enough to take the chill off without melting the ganache. Add a tiny splash of water before reheating — it steams back to perfection. Never reheat the whole cake; just warm individual slices. And honestly? This cake is incredible cold too, especially in summer when those berries taste like the most refreshing thing ever.