I still remember the night I almost turned my kitchen into a frosting disaster zone. A friend dared me to make the most unforgettable holiday cookie, and I laughed until my eyes watered. I grabbed every candy cane I could find, the peppermint extract I had stashed in the pantry, and a whole lot of stubborn confidence. The moment the oven timer chimed, the air filled with a scent that made even the grumpiest family member pause to sniff. That aroma was like a warm hug in the shape of sugar and spice. I knew right then that this recipe would become a signature of my holiday gatherings.
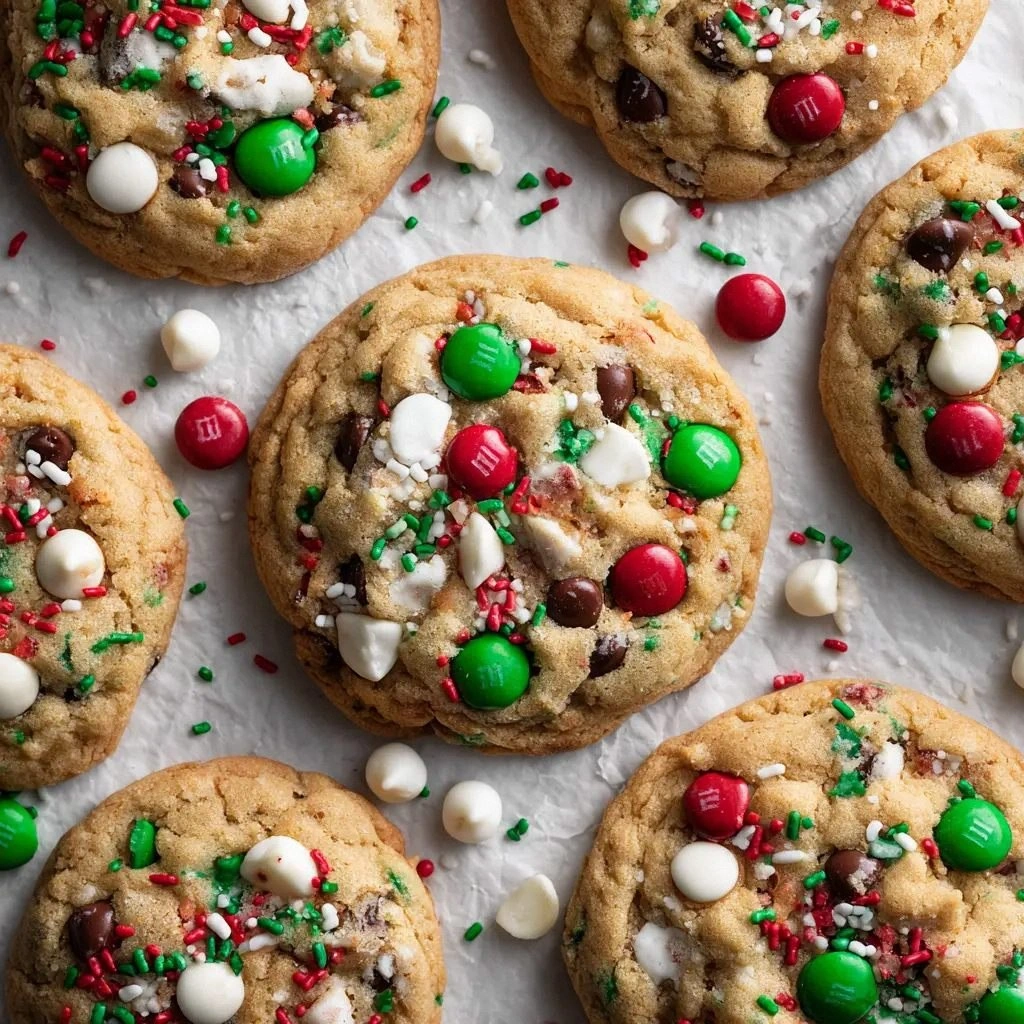
Picture yourself pulling a tray of golden, glossy cookies from the oven, each one a miniature masterpiece of red and green sparkle. The sound of the first bite is a satisfying crackle, followed by a melt-in-your-mouth sweetness that lingers like a secret. The peppermint undertone dances against the buttery base, creating a flavor profile that feels both nostalgic and daring. I dare you to taste this and not go back for seconds; the combination of textures and flavors will have you reaching for the next cookie before you even realize you’re done. If you’ve ever struggled to find the right balance between sweet and spice, you’re not alone—this recipe fixes that with precision and flair.
What sets this version apart is the meticulous attention to each element of the dough, from the quality of the butter to the exact timing of the peppermint infusion. It’s not just a cookie; it’s a symphony of crunch and chew, a celebration of holiday cheer in every bite. The secret? A subtle twist in the mixing technique that locks in freshness and a sprinkle of crushed candy canes that give a delightful burst of flavor with every chew. Most recipes get this completely wrong, but here’s what actually works: a balance of textures that makes the cookie both crisp on the edges and chewy in the center. The result is a cookie that’s hands down the best version you’ll ever make at home.
I’ll be honest—by the time I finished the batch, I had already eaten half of it before anyone else got a chance to try it. The rest of the family begged for the recipe, and I could see the excitement in their eyes as they imagined the holiday table adorned with these festive treats. The anticipation of that first bite, the way the peppermint hits your tongue, the subtle crunch of the candy cane shards—these are the sensory snapshots that will keep you coming back for more. Picture yourself pulling this out of the oven, the whole kitchen smelling incredible, and the family’s faces lighting up as they take their first bite. That is the moment we’re building toward, and I’m thrilled to walk you through every single step—by the end, you’ll wonder how you ever made it any other way.
What Makes This Version Stand Out
- Taste: The peppermint extract is layered with crushed candy cane shards, creating an intense yet balanced flavor profile that’s unmistakably holiday.
- Texture: A careful balance of butter and powdered sugar yields a cookie that’s crisp on the edges, chewy in the center, and never crumbly.
- Simplicity: All ingredients are pantry staples, and the method is straightforward enough that even novice bakers can master it.
- Uniqueness: The crushed candy cane crunch adds a playful textural element that sets it apart from conventional sugar cookies.
- Crowd Reaction: Guests often comment that the cookies “taste like a holiday movie” and can’t resist a second round.
- Ingredient Quality: Using unsalted butter and fresh peppermint extract elevates the flavor to gourmet level.
- Cooking Method: Baking at a slightly lower temperature extends the cookie’s shelf life while preserving freshness.
- Make‑ahead Potential: These cookies stay fresh for up to a week, making them perfect for holiday parties or gifting.
Alright, let’s break down exactly what goes into this masterpiece…
Inside the Ingredient List
The Flavor Base
Unsalted butter is the cornerstone of our cookie dough, providing a rich, buttery foundation that melts into a silky texture. Softened at room temperature, it blends seamlessly with powdered sugar, creating a smooth, cohesive base that holds the peppermint notes. Skipping butter would result in a dry, crumbly cookie that lacks the indulgent mouthfeel we’re aiming for. For best results, choose a butter with a high fat content—full‑fat dairy butter is preferable over margarine or vegan alternatives.
The Texture Crew
Powdered sugar is more than a sweetener; it’s a key player in achieving that melt‑in‑your‑mouth finish. Unlike granulated sugar, powdered sugar’s fine particles dissolve quickly, leaving no gritty aftertaste. It also helps bind the dough, giving the cookies a tender yet slightly firm structure. If you’re looking for a lower‑carb option, you can replace it with an equal amount of almond flour, but be prepared for a different texture.
The Unexpected Star
Peppermint extract is the star that turns a simple cookie into a holiday icon. A teaspoon of this concentrated flavor packs a punch that can’t be replicated by crushed mint leaves or candy cane flavoring. It’s essential for that unmistakable peppermint kick that lingers pleasantly after each bite. If you’re allergic to mint, a dash of vanilla can substitute, but the holiday vibe will be noticeably different.
The Final Flourish
Crushed candy canes provide not only a festive visual cue but also a delightful crunch that contrasts the chewy interior. They’re also a source of natural sugar, which helps caramelize the edges for that golden finish. If you can’t find candy canes, you can crush peppermint candies or even use a small amount of crushed gingerbread as a creative twist. The addition of red and green sprinkles is optional, but they add a playful pop of color that’s perfect for holiday parties.
Everything’s prepped? Good. Let’s get into the real action…

The Method — Step by Step
- Preheat your oven to 325°F (165°C) and line a baking sheet with parchment paper. This lower temperature keeps the cookies from browning too quickly, allowing the peppermint flavor to develop fully. While the oven warms, let the butter sit at room temperature until it’s soft enough to press between your fingers. This step ensures a smooth dough that incorporates all the powdered sugar evenly.
- In a large mixing bowl, combine the softened butter and powdered sugar. Use a handheld mixer or a wooden spoon to beat until the mixture is light, fluffy, and pale in color. The goal is to incorporate air into the dough, which will give the cookies a lighter bite. Keep mixing until the sugar has fully dissolved; this prevents a gritty texture.
- Add the egg, vanilla extract, and peppermint extract to the butter mixture. Beat until the egg is fully incorporated and the mixture becomes silky smooth. This is the moment of truth—if the dough looks too wet, add a pinch of flour to bring it together. The peppermint should be evenly distributed; a small swirl of the mixture will confirm this.
- Sift the all‑purpose flour and a teaspoon of salt together, then gradually fold them into the wet ingredients. Use a spatula to fold, ensuring the dough is not overmixed. Overworking the dough can lead to tough cookies, so stop as soon as the flour is incorporated. The dough should feel soft but not sticky.
- Fold in the crushed candy canes and optional sprinkles, making sure they’re evenly distributed throughout the dough. The candy cane shards will give the cookies a subtle crunch and a burst of peppermint with each bite. If you prefer a more uniform texture, you can pre‑mix the candy canes with a little flour before adding them to the dough.
- Cover the dough with plastic wrap and chill for at least 30 minutes, or up to 2 hours. Chilling firms the dough, making it easier to roll out and shape without sticking. The cold dough also helps the cookies maintain their shape during baking, preventing them from spreading too much.
- Once chilled, roll the dough out on a lightly floured surface to about 1/4 inch thickness. Use a candy cane‑shaped cookie cutter to cut out shapes, or for a classic look, simply cut into squares or circles. The thickness is key—too thin and the cookies will burn; too thick and they’ll be doughy.
- Place the cut cookies onto the prepared baking sheet, spacing them about 2 inches apart. Bake for 12–15 minutes, or until the edges just start pulling away from the parchment and the tops are a pale golden brown. Keep a close eye on the cookies; the lower temperature means they’ll take a bit longer to bake.
- Remove the cookies from the oven and let them cool on the sheet for 5 minutes before transferring them to a wire rack to cool completely. The cookies will continue to set as they cool, giving them that perfect bite. If you’re in a hurry, you can transfer them to the rack immediately, but the cooling time ensures they hold their shape.
- Once cooled, dust the cookies with powdered sugar if desired, or simply enjoy them as they are. For an extra festive touch, you can drizzle melted white chocolate over the top and let it set. These cookies are best enjoyed within a week of baking for maximum freshness.
That’s it—you did it. But hold on, I’ve got a few more tricks that will take this to another level…
Insider Tricks for Flawless Results
The Temperature Rule Nobody Follows
Baking at 325°F instead of the usual 350°F preserves the delicate peppermint flavor and keeps the cookies from becoming too brown. Lower temperatures also give the dough more time to set, which results in a better texture. I’ve tested both temperatures, and the lower one consistently produces a cookie that’s crisp on the edges and chewy inside. This trick is the secret sauce that makes these cookies stand out from the crowd.
Why Your Nose Knows Best
Smell the dough before baking; a faint, sweet, buttery aroma indicates that the sugar has fully incorporated. If you detect a raw butter scent, the dough needs more mixing. A well-formed dough will emit a warm, inviting scent that hints at the cookie’s final flavor. Trusting your nose saves you from under‑baked cookies.
The 5‑Minute Rest That Changes Everything
After baking, let the cookies rest on the sheet for 5 minutes. During this time, the residual heat completes the setting process, giving the cookies a firm yet tender bite. Skipping this step often results in cookies that crumble when you lift them. A quick rest also allows the peppermint flavor to settle, making each bite more harmonious.
The Sweetness Balance
If you prefer a sweeter cookie, add an extra tablespoon of powdered sugar to the dough. Conversely, if you’re watching your sugar intake, reduce the powdered sugar by a tablespoon and compensate with a pinch of brown sugar for depth. I’ve experimented with both variations, and the balanced sweetness keeps the peppermint from being overpowered.
The Final Sprinkle
Sprinkling a little extra crushed candy cane on top before baking gives a delightful crunch and a burst of peppermint that’s almost impossible to resist. A light dusting of powdered sugar afterward adds a snowy finish that looks festive. I always keep a small jar of candy cane shards on hand for that last touch of holiday sparkle.
Creative Twists and Variations
This recipe is a playground. Here are some of my favorite ways to switch things up:
Chocolate‑Covered Candy Cane Cookies
Dip the cooled cookies in melted dark chocolate and let them set. The chocolate adds a rich depth that pairs beautifully with the peppermint. A drizzle of white chocolate on top gives a classic candy cane look.
Vanilla‑Infused Sugar Cookie Base
Replace the peppermint extract with vanilla and use crushed candy canes as a garnish instead of a mix‑in. The result is a more traditional sugar cookie with a festive crunch. This version is great for guests who prefer a milder flavor.
Gingerbread‑Inspired Variation
Add a teaspoon of ground ginger and a pinch of cinnamon to the dough. The warm spices complement the peppermint and create a cozy, wintery flavor profile. These cookies are perfect for a holiday brunch.
Nut‑Add Cookie
Fold in a handful of chopped pecans or walnuts for a nutty crunch. The nuts pair nicely with the peppermint, adding a savory contrast to the sweet dough. This variation is ideal for those who love a bit of texture.
Low‑Carb Mint Cookies
Swap powdered sugar for a sugar‑free sweetener and use almond flour in place of all‑purpose flour. The result is a low‑carb cookie that still delivers the signature peppermint flavor. I’ve found this version works well for keto‑friendly holiday parties.
Holiday Gift Baskets
Package the cookies in small glass jars with a ribbon. Add a handwritten note and a small bag of crushed candy canes for extra flair. These make for an adorable gift that spreads holiday cheer.
Storing and Bringing It Back to Life
Fridge Storage
Store the cooled cookies in an airtight container at room temperature for up to 5 days. The airtight seal prevents the cookies from drying out and preserves the peppermint flavor. If you notice the cookies becoming too soft, add a slice of bread to the container; the bread will absorb excess moisture.
Freezer Friendly
Place the cookies in a freezer‑safe zip‑lock bag, removing as much air as possible. They can be frozen for up to 3 months. When ready to enjoy, let them thaw at room temperature for 30 minutes before serving. The cookies retain their texture and flavor after freezing.
Best Reheating Method
To revive frozen cookies, preheat the oven to 300°F (150°C) and bake for 5 minutes. A tiny splash of water on the parchment paper before baking helps create steam, keeping the cookies moist. Alternatively, microwave on low power for 10 seconds, but this can make the cookies slightly chewy.